Question from the audience: “I’d like my shoulders to look ripped but I don’t have much time for weight training at the gym. What should I do?”
A: What we’re facing here is the same issue we addressed in the hot abs series 6 weeks ago. Good looks come from good health and from strength. Toning one or two muscles to look good won’t do it. People who charge into the gym and immediately start lifting weights overhead are a disaster waiting to happen. Any minute now they will develop shoulder impingement, rotator cuff problems, neck pain, or thoracic outlet syndrome, if they don’t have it already. You can pick these people out from a hundred yards away. Their deltoids are ripped but their necks don’t turn, their shoulders are rounded forward from overdeveloped pectoralis major and virtually no use of their scapular stabilizers, and also scrunched up by their ears due to upper trapezius overuse. If you call their name they turn their entire trunk to look at you–not hot. You need all the all the major muscles serving an area of the body functioning properly in order to develop strength while protecting the joints. During the hot abs series, we addressed core strength. For ripped shoulders we’re going back to the core again–this time the core muscles of the shoulder girdle, the ones we hate to think about: the scapular area muscles–your middle trapezius, lower trapezius, rhomboids, latissimus dorsi, serratus anterior, and pectoralis minor. Without boring you to death reviewing the anatomy of the shoulder I will tell you that you need these muscles for proper shoulder alignment, posture, mobility, and stability, and if you ignore them your weight training experience will be painfully short-lived. The exercises I am going to give you will strengthen the entire shoulder girdle. They will focus on the scapular area but will also work the rotator cuff and the muscles everybody wants, the deltoids.
“But who has time to strengthen all those muscles! I only have time to strengthen a couple of them!” People are wailing, and I am here to tell you that the beauty of this muscle group is that it functions as a unit, and you can get them all in about 10 minutes of exercises, 3 or 4 times a week. You don’t need a gym. All you need is gravity, a floor, and a step in your home. Most people have that. A couple of hand held weights would be an added bonus.
So let’s get ready to exercise. We’re going to be doing several versions of 2 main exercises. I’ve included photos and videos of exercises performed by fitness models, and also performed by me, because 1) I couldn’t find any fitness models who could perform the exercises correctly, and 2) I think it’s very important for clients to not be intimidated imagery. You do not need to be shirtless with stunning hair, teeth, and a physique to match in a lovely studio to get strong. You can wear a T-shirt and jeans and perform the exercises at your own pace in your basement that doubles as your office with your kids hanging around, and perform exercises that would make fitness models cry!
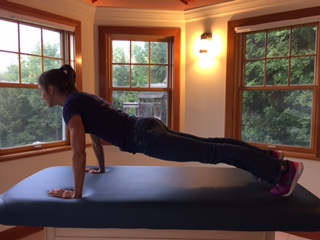
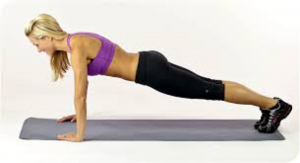
- The first is everyone’s favorite, the plank! Should we review? It is hard to find an image of anyone doing a plank correctly, but this one isn’t too bad, although the smile of course is a little incongruous… The exercise basically looks like this:
 Hold this position and draw in your belly button, don’t let your back sag into an arch, keep your butt tight and low, keep your quads contracted, breathe! For extra shoulder work you are going to push the floor away from you, pushing from the shoulders. Why do we like the plank for ripped shoulders? It is an awesome isometric exercise (that’s a strengthening exercise where the muscles contract against resistance without actually moving the limb). You get a beautiful co-contraction of all your rotator cuff muscles and your scapular muscles to hold this position. You can start with 30 seconds of this position to warm up. Anyone need an extra challenge? If you have a foam roll, medicine ball, or BOSU try holding the plank with your hands on one of these. Even a well-inflated basketball or soccer ball would work.
- From here, you can do some push-ups. Don’t worry, it will be over soon. Start from the plank position and lower yourself as close to the floor as possible, then push up. If you absolutely, physically cannot do this, let your knees drop to the floor and perform them from your knees, keeping your body in a straight line and your weight on your hands. Start with 10 and work up to 3 sets of 10, but let’s go for quality over quantity here. I’d prefer you do 10 good push-ups rather than 30 bad-form push-ups. For extra challenge balance your feet on the ball, foam roll or BOSU.
- Now, over to the steps. You are going to perform your plank on hands in front of the steps. Get your bearings, then you are going to climb the step while holding your plank. Left hand up, right hand up, left hand down, right hand down. Start with ten leading with the left hand, then do ten leading with the right hand. Work up to 3 sets of 10 of each.
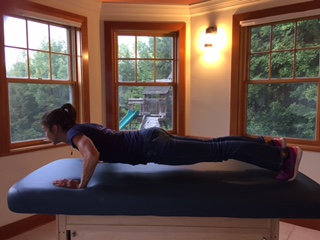
When doing plank exercises, we of course can’t forget the side plank, remember this?

You can perform the side plank on your elbow or on your hand. Start with 30 seconds on each side. If you think you have your balance, take your top arm, straighten it and reach it toward the floor, and then straight up in the air toward the ceiling. Think about pinching your shoulder blade back and opening up your chest to accomplish this motion. Repeat 1-3 sets of 10 each side, with a hand held weight, water bottle or soup can for some added resistance.
Fun times, right? Now we’re going to do something different: The burpee, which I think of as a yoga sun salutation on steroids. This is an explosive, plyometric exercise consisting of 4 parts, and it goes like this:
- Start in a standing position.
- Bend forward at the waist, put your hands on the floor, and jump your feet back into a plank.
- Jump your feet forward to meet your hands.
- Come into a squat position, back straight, and jump straight into the air into a standing position.
If you cannot jump–foot pain, back pain, or it just feels all wrong–you can modify the burpee and just take out the jumping. You can lunge or step back into the plank position if necessary. Just keep your weight over your hands at all times.
We’re going to do 4 sets of 10 burpees each. Each set of 10 will be a little different. Here we go:
- Start with 10 straight, basic burpees. Take a 30 second rest. Now it’s going to get more exciting!
- Next set of 10: jump out to the plank position. From here, do one push-up. Return to your plank and finish your burpee. Repeat. 30 second rest after this set.
- If you have hand held weights, now would be a good time to get them and hold one in each hand. We are going to take the jump up in the air out of this set. So you are going to bend over at the waist and jump back into the plank, balancing on your weights. This time you are going to perform a row. Lift your left elbow to the ceiling by pinching your shoulder blade back, lower and return to the plank, then lift your right elbow toward the ceiling, return to the plank. Holding your plank, perform this alternating row 3 times. Now jump your feet to your hands, then stand up. If you feel up to it, for a little deltoid extra work you may do a shoulder press with your weights over your head. If this bothers your shoulders then modify –lift your straight arms to just below shoulder height instead. Perform 10 times.
- Last set! We’re going to combine #2 and #3, again no jump up in the air. Take your weights, bend forward at the waist, jump back into your plank. Lift the left elbow, lift the right elbow, perform one push up, jump your feet to your hands, stand up, and shoulder press overhead or arm raise! See if you can perform 10. This is advanced, and exhausting!
“Why are you making us do this?” Everyone is crying. Because it’s fast! Nothing builds strength and great muscle tone like speed, quick weight shifts, and plyometrics! Plus these are combination exercises, which I love–rather than slogging through 30 boring reps of rows, 30 boring reps of arm raises, and so on you are combining them and using the concept of active recovery. Instead of doing the same exercise 30 times in a row you alternate movements, allowing your body a moment of recovery, say, from the row during the push-up–so you will actually be able to bang out more repetitions of each exercise than you would if you were to perform each exercise separately and consecutively. Now I’m boring myself.
When you get the hang of these, you will be able to power through most of them in 10 minutes or less and also receive the benefits of strengthening your abdominal, gluteal, and quadriceps muscles as well. Try them out, mix them up, do 10 minutes of hard work 3 or 4 times a week and you will see results very soon. As always, if something hurts or doesn’t feel right, stop immediately and private message me, or another trusted health professional.
–Kathleen Doehla, M.S. P.T.